Wednesday, 30 May 2012

Headology

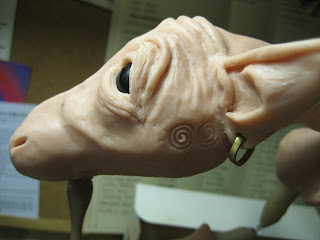
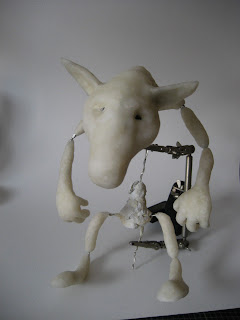
I've got quite a clear image in my head now of how I want my little troll to look when he's finished. Whether I can achieve that is another matter but it's finally time to work on the head...

I put a very thin layer of sculpey over the whole thing first to start it off, leaving the ears till later.


After that I wanted to site the eyes. The thing is, after checking my stash of glass boot button eyes that I used for making teddy bears, I was torn between two options, one of which meant I had to do a bad thing. So bad I can't even say it but I think this picture will explain:


May Ursula the Bear Goddess forgive me. I will replace it as soon as I can, I promise. Even worse, in the end I went for the other option, using bigger eyes.

A bit more work and eekk!!! it looks like Seth Brundle at the end of Cronenberg's version of 'The Fly'!!


But I kept wittling away. No, wittling's the wrong word. What's the opposite of wittling? Anyway, quite a few hours later and I ended up with something that owes much of its looks to John Bauer, Brian and Wendy Froud, and just a little bit of Guillermo del Toro :)


Sunday, 27 May 2012

Sculpting hands

As an artist I know how difficult it can be to draw and paint hands. It's one of the things that lots of artists struggle with. I know I have and still do from time to time. Get it even slightly wrong and it can ruin an otherwise good image. So I was full of trepidation when I started to sculpt the hands. But what a revelation!! Instead of struggling I really, really enjoyed it. Perhaps it was because working in 3 dimensions removes the worry about foreshortening, I don't know, but I had a blast doing the first hand.

Of course, when things are going well something always happens to balance it somewhat. It was raining all day while I was working. This shouldn't really be a problem - nice cosy room to work in, as much coffee as I can drink, but.. a rainy day means bored cats who won't go out in the wet, which leads to this kind of thing -


After much sniffing of jars and pliers, and an attempt to bite a troll ear he turned his attention to the feet, got a troll foot hair up his nose and promptly sneezed. Lovely, I get sprayed with cat bogeys...
But if that was the price I had to pay, it was a small one, I think, to end up with a pair of gnarly old troll hands that worked out much better than I'd expected.


(the hand on the right is mine by the way - just in case you were wondering ;)  )

Sunday, 20 May 2012

Big Hairy Troll Feet!!

Yup, I think it's going to be a troll...

The Fimo and the armature survived its baking in tact, no burnt tape, noxious fumes or damaged ovens!!

Finally I can start the sculpting proper. I got a collection of sculpting 'tools' ready - everything from the couple of clay modelling tools that I haven't destroyed with hardened polyfiller over the years, the two dental tools I bought at Tiranti's many years ago, a large doll needle, a pair of tweezers and a wooden satay/kebab stick which has proved to be one of the best things (and the cheapest) for adding small details.


So thought I should begin with the feet. I don't know how many toes a troll has but three seemed like a good number. The first foot complete, I decided it needed some hair. So, sadly, my 1" stipple brush will never be able to stipple evenly now that I've cut a chunk of hairs out of it. Quite a few hairs had split ends which was even better - two for the price of one so to speak. I had no idea if they would actually stay in place once the clay was baked but if they dropped out I'd just cover the holes with a bit more clay.


As the body is going to be fabric rather than sculpted I've added widened 'cuffs' to the ankles to tuck the fabric into. Years ago I remember reading an article on making soft-bodied dolls and the artist put some tiny holes around the neck/shoulder, elbows and ankles of the clay pieces so that they could sew them onto the fabric body. This seems like a good idea, as I plan to dress my troll so they'll be hidden.


Right! Off to the oven again. Onwards and upwards....to the hands...

Tuesday, 15 May 2012

Scary stuff.

The milliput I put round the hip is looking a bit dodgey but I think it'll hold for now. It's time to make some bones! yay!

I was going to use ordinary white sculpey but that whole 15 minutes per quarter inch thing was preying on my mind. Then I started worrying about the masking tape - what if it burns in the oven? Or what if the pva glue gives off poisonous fumes? Eek!! What if there's air trapped in the foil and the whole thing explodes and ruins my oven? Scary stuff...

In the end I think I found a safe option. Cover everything in a layer of Fimo - no 15 minutes per quarter inch here, just whack it in the oven at 130c for 25 minutes.

I started with the legs and feet, then moved on to the arms. Bugger! I realised that I'd have to decide on a pose for the hands if I was going to do this. Hmmmm...he looks like he would probably need a walking stick, not least because his head is going to weigh quite a bit, and his back and neck being curved as they are. So the basic hands needed to be bent to hold a stick or staff of some kind.

It was beginning to get a bit cumbersome to handle at this point. Then I remembered the little widgity, grippy thing that had belonged to my dad. He used to make model railways and had all kinds of tools and bits'n'pieces that I've inherited. That did the trick and as it's all metal I'll be able to use it in the oven too!! :)

On to the head. Two packets of Fimo later and he's all done ready for cooking. Feeling a bit chuffed that I even remembered to make eye holes through the clay so I can glue in the stems on the boot button glass eyes later on.


Sunday, 13 May 2012

Half-baked

I've realised that the 'thing' sitting on my desk looks like the demonic spawn of an orgy on Planet Clanger. But not to worry. It'll all be hidden eventually. I was itching to get the clay out but I needed to sort its dodgy hip joint first. Rummaging in a drawer I found a packet of Milliput that's almost as old as I am and mixed a dollop of it to wrap around the hip joint.


Now, I've read about two different ways of sealing the foil before adding the clay. One is to cover the foil in masking tape, the other to seal it with pva glue. So, which to choose? In the end I thought 'Well, both can't hurt' so started wrapping the foil in strips of masking tape. Now I've got the mummified demonic spawn of an orgy on Planet Clanger...


It's weird sometimes how inspiration presents itself. Having made the decision to start a sculpture, someone shared a photo on Facebook of a sculpted piece I'd admired on DeviantArt, which led to more pictures and more links, and before I knew it my enthusiasm had doubled after seeing all these fabulous pieces, and taking another look at some of my favourites. Feast your eyes while the glue dries....


Firstly my good friend Kevin Buntin.


Second - Candice Cinque


 Karen from Lunaozi Dreams


And from Imps and Things


Thursday, 10 May 2012

Wired and foiled

Okay, so,  I have all the things I think I might need on my desk, just waiting to go.(Yes, that is a very sorry looking sculpey Porsche 911 you can see on top of the green box. Long story - I blame James May from Top Gear...)


 I knew I needed to make some kind of armature - I've watched one or two clips on YouTube and read some tutorials (like this one). I have a vague idea now about the kind of creature I want to make so I started twisting lots of wire together - and didn't managed to poke myself in the eye, Yay! With a very basic body shape completed I was all fired up with the new things I'd learned and whipped out the aluminium foil. I didn't know you could use that, I'd used a lump of Fimo for the base of the creature in my last posting, but the foil is much better, and lighter. An hour later and head was starting to take shape. I got quite ambitious at this point, added some ears and formed two indentations for the eye sockets. Okay, so it's really top-heavy but I think (hope!) I have a cunning plan to fix that later on.


I'm probably over-stretching my skills here but I added some fingers, though I stopped short of doing the same with the toes. By this time it was 11.30pm, I'd used all the aluminium foil in the house and could've done with a KitKat - energy boost AND a bit more foil :) Time to call it a night.


Tuesday, 8 May 2012

So, I've got this lump of Sculpey...

I've been eyeing up a box of Super Sculpey I've had lying in a drawer for years. "I really must do something with that," I've been telling myself.

I don't really do a lot of sculpting. I haven't made anything for years and can probably count on one hand all the pieces I have made. My very first 'sculpture' happened quite by accident. One night my boyfriend at the time turned up on the doorstep with a big grin on his face. "I've brought you this!" he said, and handed me the foam cushion from a bus seat! I know, I know, other boys would bring flowers or maybe chocolates but he was a weird boy. Anyway, it turned out that he had been walking home the night before and some kids had thrown it at him out of a passing bus window - no, really. So after looking at it for a few days I set about it with a pair of nail scissors and eventually, out of the growing pile of foam clippings Bert the Dragon emerged.


Sadly, this is the only remaining photo of Bert, taken through a display case (yes, my art teacher made me put him on display :-O )

Later attempts at 3D work were done using Daz air-hardening clay - I wasn't very good, bits kept dropping off; then Milliput putty - nice but sticky. Finally a friend of mine, Jason who is an excellent sculptor of fantasy creatures, took pity on me and told me about Super Sculpey. I thought it was my birthday - this stuff is just fab and soon spawned the offensive little creature you see below.


So, suddenly this week I found myself with the overwhelming urge to make 'something'. Once I get a bee in my bonnet about this kind of thing, the meerest hint of a sniff of an idea forming, I want to working on it before the feeling fades or the images drift from my mind again. My work table is now covered with dental tools, pliers, masking tape and clay. I don't know exactly what I'm making yet but I'm going to chart my progress, problems, injuries (!) and hopefully successes here over the next few weeks.

Please tune in for the next exciting episode of 'Shona tries to build a creature'  :)